Wednesday, September 18, 2013

God mode in windows 7

God mode in windows 7

  Windows7 is one of most successfully and popular operating system from windows.It consists of many features for user benefits and its very user friendly also.
But windows 7 has some hidden features also to whom we are unaware.
These hidden features can be accessed in windows Using GOD Mode.

GodMode is a folder that brings together a long list of customization settings allowing you to change all your settings from one place.This is very good as you can now change all your windows settings from one single place.

Follow the following steps to create god mode folder:
1. Create a new folder
2. Rename the folder to Godmode.{ED7BA470-8E54-465E-825C-99712043E01C}

Now You have all features of Windows 7 at one place


Why my internet is slow ........?

Why my internet is slow ........?
 
At some point in time, everyone experiences a slow or dragging Internet connection. It can be extremely frustrating when browsing the information superhighway at a slow stagger. Rest assured, there are actions that you can take to prevent your Internet connection from slowing down. These elements are standard maintenance and should be performed regularly for the best results. So, I have tried to list down the points which could help you speed up your internet connection .

1. Check Your Connection: It may sound simple, but most Internet slow downs are caused by an incorrect connection to your network or Internet Service Provider. The poor souls who are stuck using dial-up Internet can try to use a different access number that has fewer people trying to connect. Most of the time, using a different access number will speed you up especially during peak Internet traffic hours. If you are using a broadband connection, be sure which network you are using. Many times, your computer will latch on to any available network in your area. You can be connected to the network of your neighbor and not even know it. You could be receiving low signal strength that can really slow down your connection.

2. Secure Your Network: Internet users who make the jump from dial-up to broadband are in such a hurry that they do not think to secure their network router from outside access. Anyone can access an unsecured network if their computer is in range of it by using Wi-Fi. This network sharing method steals your available bandwidth without you ever knowing it. Your router could be giving away free IP addresses to anyone that makes requests. In your router configuration settings, disable network sharing and secure your network with a password or passphrase. This way, anyone who attempts to connect to your network must enter your secret password. If they do not know the password, they cannot steal your connection. This will greatly improve your Internet speed.

3. Clear Your DNS Cache: Each time that your computer makes a request to visit a website, it secretly traces the IP address from the host name. This IP trace may be requested by thousands of users at the same time. Therefore, your local computer creates its own log file for IP address information known as DNS cache. This may not sound like a big deal, but you can easily visit hundreds of websites in a short time. This log data is used by your computer when trying to access a website. Instead of relying on third party DNS servers, your computer searches its own log file. This log file can hold large amounts of data or even become corrupted. Clearing this file often will speed up your Internet connection and keep the log file from becoming a problem.

4. Delete Temporary Files: Your computer stores every byte of information from each website that you visit. This information is stored in temporary data files on your computer for faster access to the websites in the future. The theory is that this method makes pages load faster since the information has already been stored on your computer. While this is true, it can also slow down your Internet connection if you do not delete the files you do not need. Regularly deleting unused temporary files will speed up your Internet connection and save valued storage space on your hard drive.

5. Turn Off Virus Protection [Potentially Harmful]: Modern virus scanning software constantly operates in the background. Most do a fantastic job of scanning files and folders for possible attacks. However, it also is using your bandwidth to send and receive data updates from the software company web server. By simply disabling your virus software while browsing the Internet, your bandwidth will increase and your Internet connection will be faster. When you need a virus protection scan in the future, enable the program for scanning.

Learning how your Internet connection can be misused is the first step to making it faster. Adhering to these tips will keep your Internet connection safe and fast.

How to Hide any Local Drive using Command prompt

How to Hide any Local Drive using Command prompt

Today Computer World tutorial is about how to hide a local drive without any 3rd party software. There are lots of free and payable software's available to hide local drive, but I'm not gonna talk about hide a local drive using a software. In this tutorial I'll show you an easiest way to hide local drive without using software. This will save your both money and time.

There are 3 methods available to hide a local drive without using any software

1. Hide a drive through gpedit
2. Hide a drive through regedit
3. Hide a drive using command prompt

Today we are covering command prompt way of doing it. So lets see how to do.

How to Hide a Local Drive using command prompt?

1. Click on Start - Run

2. In Run box type cmd and hit Enter. Now Command Prompt window will appear.

3. In command prompt, type diskpart and hit Enter.

4. Then type list volume and hit Enter.

Now it will display the list of all your computer drives details.

5. Then type the Drive Letter which you want to hide.
If you want to hide volume E, type select volume E and hit Enter.

Now follow mentioned massage will appear to you.
Volume 4 is the selected volume

6. After that, type remove letter E and hit an Enter.

That's all, you have done. Now restart your computer once. When you start your PC again, you want be able to see the particular drive in My Computer.


How to get back Hidden Drive again in My Computer.

Do the procedure which i have mentioned in step 1,2,3,4 and 5 again.

Click Start --> Run --> cmd -->

Then type diskpart - list volume - select volume E

After that type assign letter E and hit Enter.

That's all !! You have got back the hidden local drive. Once again restart your PC, now you will be able to see hidden local drive in My Computer.

Note: Your PC doesn't lost any data by doing this trick .

How to Recover Deleted Files without Using Software

How to Recover Deleted Files without Using Software

Sometimes we might have delete some important files accidentally and we need them back.
Today I'll show you a trick to recover your deleted files without using any 3rd party software. I'm not talking about restoring files from recycle bin.
This simple trick mostly works on Vista versions and all the Windows 7 versions.


So let's see how to recover deleted file without using any software

For example lets assume that you have permanently deleted "My Sweet Heart.JPG" from the folder named "My LIFE" , and now you want to recover "My Sweet Heart.JPG" back.
Do this simple trick to recover your Sweet Heart.JPG
Right Click on the particular folder
Select "Restore previous versions"


That's all, now you will see a option to recover the particular file.


If you don't see "Restore previous Versions" by Right Clicking, Go to
Control Panel -->
System and Secutiry -->
System -->
Click on System Protection (in left sidebar) -->
Select the particular drive and Click Configure -->
Then select "Restore system setting and previous versions of files" -->
Now Click on OK

Note :
Previous versions come from restore points or from windows backup.
This trick will not work at all the time.

How to Recover Hidden Files From Virus Infected USB Pendrive

How to Recover Hidden Files From Virus Infected USB Pendrive without any Software

We are using USB pen drives for data transfer between computers. It's very important to keep your data always with you. When you're using pen drives, the biggest problem is Viruses. Mostly pen drives doesn't consist any security measures. So viruses and malwares can attack our pen drive easily. If virus attacks your pen drive, it hides the all the files and creates .exe extension to replace the hidden files.

Normally you can view hidden files by clicking
Folder Options -->
View -->
Show Hidden Files and Folders
But this simple method doesn't work when your pen drive is attacked by harmful viruses.

So here I'll provide you an easiest method to view your infected files from pen drive without using any software.

Insert pen drive into computer and find drive letter of connected USB drive
For Example, E:

Now click on Start --> Run

In Run box, type cmd and hit Enter

Now command prompt will appear, in command prompt type the drive letter of your pen drive and hit Enter.
Example type E:

After that, type attrib -s -h /s /d *.*

Now hit Enter and wait for sometime. That's all, you have done !!! Now you can view all your files in pen drive without any problems.

Very useful info, share it friends

Complete Mobile Formatting Tip:

Complete Mobile Formatting Tip:

Here is the trick to format your virus infected or other problem arriving mobile phone.

FYI:: This trick is for almost all Nokia models.

 
Here's how>>

1. Switch off your phone
2. Remove the SIM card&
memory card
3. Now press & hold these keys at the same time>>
3 * call(green)
4. Then without leaving these three buttons, press the power switch button
5. Formatting task will be started and will be completed within a few moments.
> Before carrying out this process make sure you have copied ALL your CONTACTS, MESSAGES and NOTES onto your Memory/Computer . because everything will
be PERMANENTLY DELETED FROM THE PHONE.
> When the process is finished, the formatted phone will be like Brand new, just like when you have brought it
from the showroom.
> if you've forgotten your phone's lock code/password and your phone gets locked, you can unlock-it through this process.

Make Windows 7 Genuine using Command Prompt


Make Windows 7 Genuine using Command Prompt

How many of you using Genuine windows 7 ?
we all know that everyone can't buy a genuine windows 7, because cost is too high.
Lots of Windows 7 users have experienced the error message that "Windows 7 is not genuine".
This error message comes if you use pirated or OEM versions of Windows 7.
If windows 7 is not genuine, even you can't change the background wallpaper or any other display related option on your PC.

So now i'm going to show you a easy way to make your windows 7 genuine using command prompt.

How to make Windows 7 genuine using Command Prompt

Press Windows key + R
Now "run" box will appear , in "run" box type CMD
Click on OK
Note : Run CMD as Administrator

Now command prompt will appear

In command prompt type SLMGR -REARM
Hit Enter.

Wait 5-10 seconds

Now a message will appear

Done !!!
Now your Windows 7 is genuine ..
Restart your PC once. Hereafter you won't see the warning message that "Windows 7 is not genuine"

Password Protection to USB Drive without using Software

Password Protection to USB Drive without using Software

Most of the people doesn't like other people checking their personal files and folder on USB, including me. This insecure situation creates a huge space to theft our personal data by someone. If you use password protection to your USB, you can reduce the data theft.

Lots of USB password protect software available in present market, but you want to pay money to use it for lifetime. If you're using Windows you don't need any software.

So let's see how to set a password protect on your USB without using any software.

Insert your USB drive to computer
Click on Start
In "Search programs and files" box, type Bitlocker Drive Encryption
Now launch that application.

Then look for your USB drive and click on Turn on Bitlocker

Windows will ask you to set a password.
Now set a strong password.
Click on Next

If you want save the password in a safe place.
And click on Next

Now click on Star Encrypting

That's all !!!
From right now if someone tries to access your USB, Windows will ask him/her to enter the current password.

Note : This trick will works only in Windows

Top 10 Windows 7 Keyboard Shortcuts

                                                   Top 10 Windows 7 Keyboard Shortcuts

Make your computer talk what you type !

Make your computer talk what you type !

This is very good and interesting javascript trick which let your computer speaks whatever you type. There is no requirement of any software. Just follow below simple steps.

First open Notepad and copy below codes

Dim msg, sapi
msg=InputBox("Enter your text for conversion– ","By computer freaks")
Set sapi=CreateObject("sapi.spvoice")
sapi.Speak msg

Now save the notepad file as text to audio.vbs
Now close the notepad file and open it again.
You will see a window, enter your text in it and click on ok,
Done !!!

--Make your Computer Welcome You--

--Make your Computer Welcome You--

Make Windows Greet you with a Custom Voice Message at Startup
To use this trick, follow the instructions given below:-

1. Click on Start . Navigate to All Programs, Accessories and Notepad .

2. Copy and paste the exact code given below.

Dim speaks, speech
speaks="Welcome to your PC, Username "
Set speech=CreateObject("sapi.spvoice")
speech.Speak speaks

3. Replace Username with your own name .

4. Click on File Menu, Save As, select All Types in Save as Type option, and save the file as Welcome.vbs or "*.vbs".

5. Copy the saved file.
6. Navigate to C:\Documents and Settings\All Users\Start Menu\Programs\Startup (in Windows XP) or

to C:\Users\ User-Name\AppData\Roaming\Microsoft\Windows\Start Menu\Programs\Startup ( in Windows 7 and Windows Vista) if C: is your System drive.
7. Paste the file.
Now when the next time you startyour computer, Windows will welcome you in its own computerized voice.
Note : For best results, it is recommended to change sound scheme to No Sounds.
You can change the sound scheme to No Sounds by following the steps given below:-

1. Go to Control Panel.

2. Then click on Switch to Classic View.

3. Then Click on Sounds and Audio Devices.

4. Then Click on the Sounds Tab.

5. Select No Sounds from the Sound Scheme option.

6. If you wish to save your Previous Sound Scheme, you cansave it by clicking Yes in the popup menu.

7. Click on OK.

Try it yourself to see how it works. In my personal opinion, this is an excellent trick. WheneverI start my PC in front of anybody and the PC welcomes me, the fellow is left wondering how brilliant a computer do I have.

Thank you,

A simple trick to block any website.

A simple trick to block any website.
***************************************

Click on:
Start > All Programs > Accessories > Notepad (NOT Wordpad) > File > Open...
navigate to:
Local Disk (C:) > WINDOWS > system32> drivers > etc
from 'Files of Type' select 'All Files', double-click on hosts
under the entry: '127.0.0.1 localhost' leave a line, then type in:

127.0.0.1 "name of site you want to block."

For example:-
127.0.0.1 news.bbc.co.uk

Click on: File > Save, close Notepad

and DONE !!

to unblock, remove the line.

I think its helpful for parents.

Want 2 know that ur computer is “Boy” or “Girl”?

Want 2 know that ur computer is “Boy” or “Girl”?
then
1. Open Notepad

2. Copy the following line into notepad:

CreateObject("SAPI.SpVoice").Speak"I love you"

3. Save file as computer_gender.vbs

4. Run the file.

If you hear a male voice, your pc is a boy

If you hear a female voice, your pc is a girl

Now Comment Your Results whether u hv male pc or female pc.....

HOW TO MAKE SYMBOLS WITH KEYBOARD

HOW TO MAKE SYMBOLS WITH KEYBOARD

Alt + 0153..... ™... trademark symbol
Alt + 0169.... ©.... copyright symbol
Alt + 0174..... ®....registered ­ trademark symbol
Alt + 0176 ...°......degre ­e symbol
Alt + 0177 ...±....plus-or ­-minus sign
...See More....sm ­iley face
Alt + 2 ......☻.....bla­ck smiley face
Alt + 15.....☼.....su­n
Alt + 12......♀.....female sign
Alt + 11.....♂......m­ale sign
Alt + 6.......♠.....spade
Alt + 5.......♣...... ­Club
Alt + 3.............. ­Heart
Alt + 4.......♦...... ­Diamond
Alt + 13......♪.....e­ighth note
Alt + 14......♫...... ­beamed eighth note
Alt + 8721.... ∑.... N-ary summation (auto sum)
Alt + 251.....√.....s­quare root check mark
Alt + 8236.....∞..... ­infinity
Alt + 24.......↑..... ­up arrow
Alt + 25......↓...... ­down arrow
Alt + 26.....→.....ri­ght arrow
Alt + 27......←.....l­eft arrow
Alt + 18.....↕......u­p/down arrow
Alt + 29......↔...left right arrow

Use pendrive to increase RAM of your computer!

Use pendrive to increase RAM of your computer!
1.insert an empty pendrive.
2.goto properties.
3.click 'quick boost or ready boost'
set allocation value to maximum.
4.chose 'allocate this device'
5.hit ok.
That's it!! Now the pendrive acts as external RAM,thus making the pc to work faster.

Trick to increase the speed of your computer!!


Trick to increase the speed of your computer!!

By Using this trick you can use a small part of your Hard Disk as Virtual RAM.
This will Increase your Computer Speed upto 60%.
Follow the Given Steps
1. Goto “Properties” of My Computer
2. Goto Advance Tab
3. Under “Performance” section click on “Settings” button
4. Now Move to “Advance” Tab
5. Under “Virtual memory” Section click on “Change” button

6. Now Select Drive “C”
7. Select Option “Custom Size”
8. Set Initial Size (MB) to 5000 for 5GB 2000 for 2GB or Whatever suitable for you.We will recommend you to keep at least 2000
9. Set Maximum Size to 5000 for 5GB, this means 5GB of Local Disk C will be used as Virtual Memory. Better keep it as High as You can afford.
10. Click on “Set” Button
11. Perform this with all other Drives also
12. Click on “OK” Button
13. Again Click on “OK” Button
14. Again Click on “OK” Button
15. You will feel the change in your computer speed, once it is restarted.

Use notepad to free your ram!!

Use notepad to free your ram!!

*. At first open notepad.
*. Then type the code bellow.

FreeMem=Space(64000000)

*. Now save the file as cleanRam.vbs
*. That's it. Open the file (double click) and you are done.

How far do u know?

How far do u know?

1 Bit = Binary Digit
8 Bits = 1 Byte
1024 Bytes = 1 Kilobyte
1024 Kilobytes = 1 Megabyte
1024 Megabytes = 1 Gigabyte
1024 Gigabytes = 1 Terabyte
1024 Terabytes = 1 Petabyte
1024 Petabytes = 1 Exabyte
1024 Exabytes = 1 Zettabyte
1024 Zettabytes = 1 Yottabyte
1024Yottabytes = 1 Brontobyte
1024 Brontobytes = 1 Geopbyte
1024 Geopbyte=1 Saganbyte
1024 Saganbyte=1 Pijabyte
Alphabyte = 1024 Pijabyte
Kryatbyte = 1024 Alphabyte
Amosbyte = 1024 Kryatbyte
Pectrolbyte = 1024 Amosbyte
Bolgerbyte = 1024 Pectrolbyte
Sambobyte = 1024 Bolgerbyte
Quesabyte = 1024 Sambobyte
Kinsabyte = 1024 Quesabyte
Rutherbyte = 1024 Kinsabyte
Dubnibyte = 1024 Rutherbyte
Seaborgbyte = 1024 Dubnibyte
Bohrbyte = 1024 Seaborgbyte
Hassiubyte = 1024 Bohrbyte
Meitnerbyte = 1024 Hassiubyte
Darmstadbyte = 1024 Meitnerbyte
Roentbyte = 1024 Darmstadbyte
Coperbyte = 1024 Roentbyte

WHAT IS IP & WHAT IS WORK OF AN IP ?

 DO U KNOW WHAT IS IP & WHAT IS WORK OF AN IP ?

IF NO THEN SEE THIS POST

Internet Protocol (IP) addresses are usually of two types: Public and Private. If you have ever wondered to know what is the difference between a public and a private IP address, then you are at the right place.

In this post I will try to explain the difference between a public and a private IP address in layman’s terms so that it becomes simple and easy to understand.What are Public IP Addresses?

A public IP address is assigned to every computer that connects to the Internet where each IP is unique. In this case, there cannot exist two computers with the same public IP address all over the Internet. This addressing scheme makes it possible for the computers to “find each other” online and exchange information. User has no control over the IP address (public) that is assigned to the computer. The public IP address is assigned to the computer by the Internet Service Provider as soon as the computer is connected to the Internet gateway.

A public IP address can be either static or dynamic. A static public IP address does not change and is used primarily for hosting web pages or services on the Internet. On the other hand, a dynamic public IP address is chosen from a pool of available addresses and changes each time one connects to the Internet.

Most Internet users will only have a dynamic IP assigned to their computer which goes off when the computer is disconnected from the Internet. Thus when it is re-connected it gets a new IP.

You can check your public IP address by visitingwww.whatismyip.com

What are Private IP Addresses?

An IP address is considered private if the IP number falls within one of the IP address ranges reserved for private networks such as a Local Area Network (LAN). The Internet Assigned Numbers Authority (IANA) has reserved the following three blocks of the IP address space for private networks (local networks):

10.0.0.0 – 10.255.255.255 (Total Addresses: 16,777,216)172.16.0.0 – 172.31.255.255 (Total Addresses: 1,048,576)192.168.0.0 – 192.168.255.255 (Total Addresses: 65,536)

Private IP addresses are used for numbering the computers in a private network including home, school and business LANs in airports and hotels which makes it possible for the computers in the network to communicate with each other.

How To Use ProRAT?

How To Use ProRAT?

ProRat is a Microsoft Windows based backdoor trojan horse, more commonly known as a RAT (Remote Administration Tool).

Step 1: Download free software called PRO RAT.
Launch pro rat. Pro rat has a lot options as keylogger, screen shot, file manager, pc shutdown.

Step 2: You should create ProRat Server and send it to the target pc. To create server click on the bottom Create.

Step 3: Enter your IP address, if you don't know your IP address click on red arrow. Also add your email address that will be used to send email notification.

Step 4: Next go to general settings, 5110 is the port that you will connect to the target PC, you can change server password. You can give a fake error message, when the target launches your remote file, error message will be shown. You can type the error message whatever you want. You can use the option to bind with the file. You can bind server with any file. Under server extension I recommend to use EXE (has icon support ) or SCR (has icon support). Under server icon select any icon that you want that your server look out.

Step 5: Click on Create Server. Now you need to send server file to the target pc. There are many ways how you can do it. You can create server file that looks as image and email it to your friends . The most effective way by my opinion is to bind server file to the movie file and upload it to the torrent or rapidshare.

Step 6: After the target clicks on your server file, you'll be able to connect to the target PC. In main window of pro rat you'll see IP field. Type target PC IP Address. In the port field type 5110 and click Connect.

You’ll see the File Manager of hacked pc. You can download any file from the hacked PC

Saturday, September 14, 2013

30 facts and features about Windows 8:

30 facts and features about Windows 8:

1. A great feature introduced in Windows 8 is Genuine Center, through which you̢۪ll be able to enter or change your license key and view the status of your license genuineness.
2. Windows 8 On screen keyboard, can split in two parts and converts in Thumb Keyboard to provide easy access to all keys on a Tablet.

3. Multitasking has been made easy and more efficient. Windows 8 runs two different UI simultaneously.
4. Apps can communicate with each other in Windows 8.
5. Gesture-based navigation is intuitive and fast.

6. The most unique feature of Windows 8 is that it offer Multi-Monitor options where on one monitor you can display your start screen and the desktop on the other.

8. Windows 8 removes the fear of PC failure as it has Push-Button Reset option.

9. Windows 8 automatically manages to keep the PC up to date without interrupting you in the middle of your work with the newly featured Windows Update.

10. In Windows 8 cryptography is much easier.

11. Windows 8 supports newly designed SmartScreen which is a set of sophisticated technologies to help protect you from malicious websites and programs.

12. Windows 8 comes integrated with built-in drivers that support a broad range of devices, including printers, sensors, touch-input devices, and displays.

13. Secured boot stops malware in its tracks and makes Windows 8 significantly more resistant to low-level attacks.

14. Windows 8 allows mobility and connectivity virtually from anywhere.

15. In Windows 8 DirectAccess helps remote users to securely access resources within a corporate network.

16. AppLocker has been enhanced with richer capabilities and enables to manage both desktop and Metro style applications.

17. Business users can save their data from unauthorized access as Windows 8 comes preloaded with new version of BitLocker.

18. Windows 8 introduces Windows store from where you can find the apps you want, ranging from exciting new games, to the productivity tools and many more.

19. Windows 8 intends many new features for business users.

20. You can set Windows 8 to auto refresh which eliminates the need of pressing F5 again and again.

21. Windows 8 provides a reset option, which restores the PC to the state it was in when originally purchased in case a major PC failure happens.

22. You can integrate your Windows live ID account in Windows 8, hence eliminating need of creating a separate user account locally.

23. Windows 8 is going to feature built-in Cloud Apps and services with SkyDrive.

24. Protecting the pre-OS environment with UEFI.

25. Windows 8 is also likely expected to comprehend the Calling and SMS capabilities on 3G supported tablets.

26. Driver developers can use the new, integrated Microsoft Visual Studio development environment to increase productivity and develop richer applications.

27. Windows 8 supports a broad range of app programming languages (for example, C,C++,HTML5,CSS3,DirectX 11.1,XAML).

28. Windows 8 offers Windows Push Notification Service through which apps can receive secure messages from your website, and send them to your app̢۪s live tile or pro vide anotification to the user.

29.Windows 8 integrates support for contact selection directly within Windows using its feature Contact Picker.

30. Windows 8 supports Mobility and Connectivity on the Go for business users.

Windows and Apple(MAC)

                                    Windows and Apple(MAC)

Collection Of Shortcut Keys For Windows 8 !!!

Collection Of Shortcut Keys For Windows 8 !!!

1) Windows key : Access the Start screen
2) Windows+D : Access the Desktop.
3) Windows+C : Show the Charms.
4) Windows+Q (or just start typing when you are on the Start menu) : Search
5) Windows+H : Share
6) Windows+K : Start Windows Devices
7) Windows+I : Settings
Tip: When you’re ready to shut down your computer, use Windows+I and then click or tap the Power button, found on the bottom right.
Windows+Z : Show the App Bar while in any app.
9) Windows+Tab or Alt+Tab : Cycle through open apps.
10) Zoom in and out : Ctrl+- to zoom out and Ctrl++ to zoom in
11) Windows+period : Snap an app to one side of the screen : .
Tip: You’ll find that many of the traditional shortcuts you’ve always used still exist, such as Windows+L to lock and Windows+P to project to another display.
12) Start Screen : Windows Key
13) Right Shift key : If you press it for eight seconds, it turns on Filter Keys. If you press it five times in a row, it turns on Sticky Keys.
14) Ctrl+mouse wheel : When used on the desktop, it changes the size of your desktop icons. When used on the Start screen, it zooms in and out.
15) Ctrl+A : Select all.
16) Win+C : Open the charms.
17) Ctrl+C : Copy.
18) Win+D : Show the desktop.
19) Alt +D : Select the address bar in Internet Explorer.
20) Ctrl+Alt +D : Enable the Docked mode in the Magnifier tool.
21) Win+E : Open File Explorer.
22) Ctrl+E : Select the search box in File Explorer.
23) Win+F : Show Files in the Search charm.
24) Win+Ctrl+F : Open the Find Computers window, which can find computers on a network (used mostly in business networks).
25) Win+G : Cycle through desktop gadgets.
26) Win+H : Open the Share charm.
27) Win+I : Open the Settings charm.
28) Ctrl+Alt +I : Invert colors in the Magnifier tool.
29) Win+J : Switch the focus between snapped apps and larger apps.
30) Win+K : Open the Devices charm.
31) Win+L : Lock the computer and display the Lock screen.
32) Ctrl+Alt +L : Enable Lens mode in the Magnifier tool.
33) Win+M : Minimize all the windows on the desktop.
34) Ctrl+N : Open a new File Explorer window.
35) Ctrl+Shift +N : Create a new folder in File Explorer.
36) Win+O : Change the Lock screen orientation.
37) Win+P : Open the project options for a second screen.
38) Win+Q : Open the Search charm.
39) Win+R : Open the Run window.
40) Ctrl+R : Refresh.
41) Win+T : Set the focus on the taskbar and cycle through the running desktop apps.
42) Win+U : Launch the Ease of Access Center.
43) Win+V : Cycle through notifications.
44) Win+Shift +V : Cycle through notifications in backward order.
45) Ctrl+V : Paste.
46) Win+W : Open Settings in the search charm.
47) Ctrl+W : Close the current window. It works only in desktop apps.
48) Win+X : Open the hidden system menu.
49) Ctrl+X : Cut.
50) Ctrl+Y : Redo.

Errors:

Errors:
Most of us come across the internet errors, during browsing.. Here we give the correct meanings or the mistakes which we have done..

Error 400 - Bad request.
Error 401 - unauthorized
request.
Error 403 - forbidden.
Error 404 - Not found.
Error 500 -Internal error.
Error 501 - Not Implemented
Error 502 - Bad Gateway
Error 503 -Service unavailable.
Error 504 - Gateway Time-Out
Error 505 - HTTP Version not supported/DNS Lookup Fail/unknwn host
Error 500-599 - Server Errors.

Share it Some of your friends don't know about it .

Class of Memory .......Know About this..!!!

Class of Memory .......Know About this..!!!

Know About Laptop Battery ....

Know About Laptop Battery ....

PC Errors & Solutions

PC Errors & Solutions

1. MONITOR LED IS BLINKING Check all the connections like Monitor Cable, Data cables,RAM, Display Card , CPU connections.

2. CONTINUOS THREE BEEPS Problem in RAM Connection.

3. THREE BEEPS ( 1 Long 2 Short) Problem in Display Card Connection

4. THREE LONG BEEPS PERIOD WISE Problem in BIOS or RAM (Basic Input Output System)

5. CONTINUOS NON-STOP BEEPING Key Board Problem (I.e.; Some Key is pressed for Longer time)

6. FDD LED IS GLOWING CONTINUOSLY Data cable to be connected properly (twisted cable).

7. NO DISPLAY ON THE SCREEN AT ALL Hard Disk cable connected wrongly. Connect rightly seeing the Red mark (Faces power supply) and then Restart.

8. POWER LED IS OFF a. Check main power cord b. Check S.M.P.S. c. Check Mother Board connection

9. SHOWING CMOS ERROR Replace 3 Volt battery of Mother Board . Set Original Settings Manually.(Refer CMOS Setup chart) Enter your search termsSubmit search form

10. SHOWING FDD ERROR OR FLOPPY DRIVE IS NOT WORKING PROPERLY Check Power cord of FDD , Data Cables , set CMOS & Finally the Check drive.

11. SHOWING HDD ERROR OR HARD DISK FAILURE a. Check Power Cord b. Check connection of HDD c. Check Data cable d. Check Hard Disk parameters in CMOS or Auto detecting Setting Partitions by Fdisk Command, then format it to set track 0.

12. MOTHER BOARD HANGS DUE TO UNSTABILIZED POWER SUPPLY a. Check S.M.P.S b. RAM not functioning properly. c. Software problem (due to using pirated software) d. CPU fan not functioning properly.

13. DANCING SCREEN a. Check Display card connection b. Virus Problem c. Video Memory Problem

14. SHAKING SCREEN a. Earthing problem b. Magnetic waves comes around.

15. CPU CABINET SHOCK a. Check Earthing b. Check main power cord.

16. NON-SYSTEM DISK ERROR a. Floppy Drive having different disk (Non-Bootable Disk) OR CMOS Parameters for Hard Disk may not be set properly. b. Hard Disk Partitions may not be created. c. Hard Disk may not be formatted.

17. MISSING OPERATING SYSTEM The System files missing namely Ie; command.com} - User File IO.SYS & MS_DOS.SYS } - Hidden Files. These above three files required for Start up of the system that can be transferred by using SYS C: Command OR While the time of formatting by using Format c:/u/s

18. MISSING COMMAND INTERPRETOR May the file Command.com is corrupted OR Infected by Virus OR Some one has Erased it.

19. SHOWING I/O ERROR
a. The type of Hard Disk in CMOS may not be set properly. b. Operating system used for formatting is not valid

20. SHOWING DIVIDE OVER- FLOW MESSAGE a. May some Directories or Files crash with other files. b. Use CHKDSK/F or SCANDISK Command to correct it.

21. HARD DISK MAKING NOISE WHILE PROCESSING a. Unstabilized power supply. b. Check for Loose Contact. c. Do not use Y Connectors for Hard Disk. d. It may create Bad Sector OR Weak Hard Disk.

22. HARD DISK HANGS WHILE PROCESSING Check for Bad Sector by using CHKDSK or SCANDISK Command. If found format the Hard Disk and set Partition before that area.(This is the only procedure to use Hard Disk with Bad Sector) OR (To avoid Bad Sectors use Standard Power Supply)

23. HARD DISK NOT DETECTED a. Check Power Connector b. Check Data Cables c. Check Jumpers

24. PARTITION NOT SHOWN Operating System where the Hard Disk formatted is not supported with present Mother Board. For Eg: Hard Disk formatted with Pentium System will hide their partitions for 486 System.

25. MMX/DLL FILE MISSING May the above files may be corrupted due to power failure or Virus. Make available above files from other Computer. OR Reinstall Windows 98 Operating System. (This procedure will not make any effect on existing Data).

26. WINDOWS REGISTRY ERROR This will happen due to sudden ON/OFF of the system. Final solution is to Reinstall Operating System.

27. DISPLAY COLOUR DOES NOT MATCH a. Configure Display Card properly with their CD. b. The Standard setting for Windows is set it to 800x600 for better performance.

28. UNKNOWN DEVICE FOUND May the Driver utility is not provided with operating system . Insert Driver CD and install software for the above Device. (Every Device requires driver utility to set active

A Mail to Tech Support..........

Dear Tech Support,

Last year I upgraded from Boyfriend 5.0 to Husband 1.0 and I noticed a distinct slowdown in the overall system performance, particularly in the

flower and jewellery applications, which operated flawlessly under Boyfriend 5.0 .

In addition, Husband 1.0 uninstalled many other valuable programs, such as Romance 9.5 and Personal Attention 6.5, and then installed undesirable

programs such as NEWS5.0, MONEY 3.0 and CRICKET 4.1 .

Conversation 8.0 no longer runs, and Housecleaning 2. 6 simply crashes the system.

Please note that I have tried running Nagging 5.3 to fix these problems,

but to no avail.
What can I do?

Signed,

desperate wife _____ _________ _________ _________ _________ _________ _________ _________ Reply


DEAR Madam,

First, keep in mind, Boyfriend 5.0 is an Entertainment Package, while

Husband 1.0 is an operating system.

Please enter command: i thought youloved me. Html and try to download Tears
6.2 and do not forget to install the Guilt 3.0 update.
If that application works as designed, Husband1..0 should then

automatically run the applications Jewellery 2..0 and Flowers 3.5..

However, remember, overuse of the above application can cause Husband 1.0 to default to Silence 2.5 or out of the house 6.1 .
Please note that out of the house 6.1 .

is a very bad program that will download the rarely at home Beta.

Whatever you do, DO NOT under any circumstances install Mother-In-Law 1.0 (it runs a virus in the background that will eventually seize control of

all your system resources.)

In addition, please do not attempt to reinstall the Boyfriend 5.0 program.
These are unsupported applications and will crash Husband 1.0 .

In summary, Husband 1.0 is a great program, but it does have limited

memory and cannot learn new applications quickly.
You might consider buying additional software to improve memory and performance.
We recommend: Cooking 3.0 and Good Looks 7.7.

Good Luck Madam!

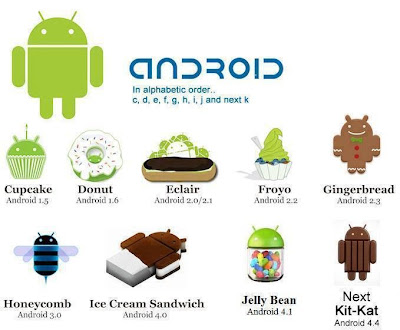
Android versions .........

Android versions .........